Friday, November 25, 2011

Table Connect: LOA Studio reveals their viral secret success story

Here is the presentation of the revelation by LOA, recorded at TEDxVienna 2011:
At the much anticipated first “live demonstration” of the Table Connect for iPhone project at today’s TEDxVienna event, design studio LOA revealed that it was all an elaborate viral marketing stunt – a combination of skillful visual effects and a meticulously planned roll-out strategy.
The Table Connect for iPhone team created massive interest in a video that showed them connecting an iPhone in a giant table surface screen that resembled an iPhone. Suddenly, all the contents of the iPhone surface were displayed on the giant screen, and the guys started performing the exact same gestures we are used to from an iPhone, with no noticeable lag whatsoever.
This is the original Table Connect for iPhone video – what the buzz was all about:
 Within hours after the video release, big tech news and blogs covered the story. From the very beginning, there were countless discussions between commenters and the media alike whether it was fake or not.
The Sun, Gizmodo, Engadget, Forbes, CNet and countless other publications posted the video and within a day, the video skyrocketed to no. 1 on the YouTube charts.
Countless media enquiries from TV channels and international media for interviews followed, but the team wanted to stay hidden until the revelation of the secret.

Boot an ISO from Hard disk using GRUB 2


Get started with a step by step process...!!!!
NOTE: this will work on only linux
Let us start………

Step 1 : Checking GRUB version

grub-install -v
GRUB 2 should display a version number of 1.96 or later. Legacy GRUB is version 0.97.
If you are using Legacy GRUB, update your GRUB by referring the following link
So… now you are upgraded to GRUB 2……. let us proceed…..

Step 2 : Get into GRUB command mode

1. Reboot your distribution
2. Hold down SHIFT to display the menu during boot ( ESC in GRUB legacy)
3. Press ‘c’ to get grub command line

Step 3 : Prepare ISO to boot

loopback loop (hd0,1)/iso/ubuntu10.4.iso
hd0,1 is the partition where the ISO file is located
/iso/ubuntu10.4.iso is the location of the filename
Change these two parameters that suites your environment
linux (loop)/casper/vmlinuz boot=casper iso-scan/filename=ubuntu10.4.iso
This command loads the vmlinuz file from ISO,
In Ubuntu vmlinz is stored inside casper , This will change in different distributions, for example in Red Hat/CentOS server vmlinuz is located inside isolinux
Filename=ubuntu10.4.iso use the appropriate file name instead of ubuntu10.4.iso.
initrd (loop)/casper/initrd.lz
This command loads the initrd.lz from ISO, again the location of initrd.lz will change in various distribution, but both vmlinuz and initrd.lz will be in the same locaiton, for example in Red Hat/CentOS server initrd.lz is also located inside isolinux
boot
Boot the system….
Now the system will be booted with ISO you specified…..

Tuesday, November 22, 2011

How to recover permanently deleted mails from Microsoft Outlook


Some of us delete the mails for keeping the mailbox minimum size as possible. Sometimes we may think about to recover the deleted mails. Besides that, the emails in the mailbox could also be removed automatically after a certain time period due to the emails retention policy configured by the email server administrator. Recovering the emails deleted using Delete button or the Delete key is undertaking.But is it still possible to recover the emails which were permanently deleted using “Shift+Delete” or emptied from the Deleted items folder. Recovery steps as follows, if the mailbox in Microsoft Outlook is hosted in Microsoft Exchange Server:
  • For Microsoft Outlook 2010

  1. Select the folder which previously stored the deleted email e.g. Inbox, Deleted Items.
  2. Click at Recover Deleted Items button from the Folder tab.
  3. A separate window with the list of recoverable emails appears.
  4. Highlight the emails to be recovered and hit the envelope button to restore the email.
  • For Microsoft Outlook 2007

  1. Select the folder which previously stored the deleted email e.g. Inbox, Deleted Items.
  2. Select “Recover Deleted Items” from the Tools menu.
  3. The email recovery window appears with the list of recoverable emails.
  4. Select the email to be recovered and click the envelope icon button to resurrect the emails.
  • For Microsoft Outlook 2003

  1. The recovery feature is not enabled by default in Microsoft Outlook 2003 and manual registry tweak is needed to activate the function. Start Registry Editor by running regedit from the Start menu.
  2. Navigate to the registry path: HKEY_LOCAL_MACHINE\SOFTWARE\Microsoft\Exchange\Client\Options
  3. Click Add value from the Edit menu and add the create the following registry value (DumpsterAlwaysOn):
  4. Restart Outlook and find the new option – Recover Deleted Items under the Tools menu.

Monday, November 21, 2011

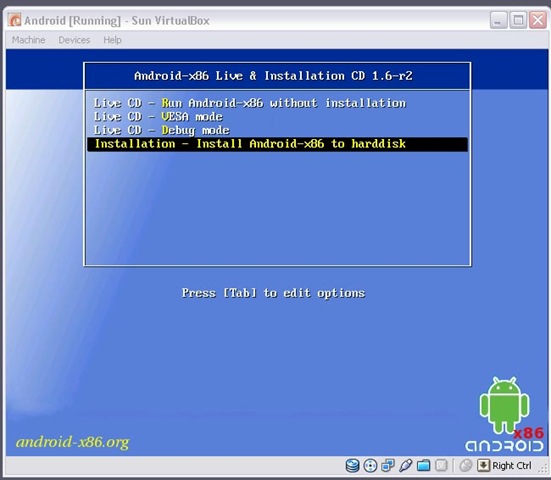
Install android on x86 Based desktop or laptop


Now you can test android without an android supported phone, this will help you to review android OS.
Android is a Linux based Operating system for Mobile and tablet devices like netbooks.
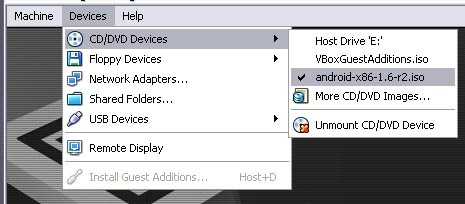
Here I used Oracle VirtualBox (Virtualization platform ) to install Android. You can install to hard disk directly. X86 Based OS image is available for download.
Here I virtualized with Oracle Virtual Box , You can download the X86 version of Android fromhttp://www.android-x86.org
Or Download From here

screenshots of Android Desktop installation


Mount ISO
android desktop install 1

Saturday, November 19, 2011


A Film By  VISHNU VARDHAN & PAWAN KALYAN's---" PANJAA " Movie Audio will Released ...!!!


DIRECT DOWNLOAD LINK : Click Her To Download

Don 2 Movie Songs Download

Sharukhan's "DON" was a super hit and now, We all waiting, Don2 is ready For RELEASE with in few days in our favourate THEATERS..!!!

ENJOY THE SONGS OF  "DON 2"


Direct Download Link :  Click Here to Download

Friday, November 18, 2011

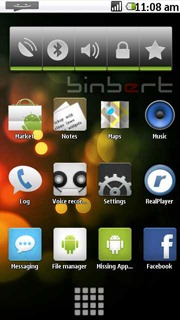
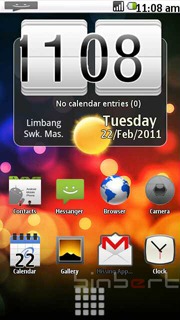
Install Android 2.1 UI on Nokia S60v5 mobile


Android NokiaAndroid 5800
I was searching for a solution to run android on my Nokia 5230. I found some YouTube videos with tag Android and Nokia. After a long search I found some solution to tweak the user interface of Nokia with an Android. Here are the steps to change Nokia UI to an Android UI on Symbian 60V5. Remember this will change only the User interface. You can always uninstall.
1. Download GDesk.rar from following link
2. Extract  and rename the folder as   “+GDesk”
3. Copy “+GDesk” folder to your phone memory
4. Go to +GDesk\Gdesk v0.33g Install SIS And install all applications, files listed below
GDesk.0.33g.SIS
GDeskAgnViewS60.0.33g.sis
GDeskClockS60.0.33g.sis
GDeskInfoViewS60.0.33g.sis
GDeskNotepadS60.0.33g.sis
GDeskShortcutsS60.0.33g.sis
GDeskTaskManS60.0.33g.sis
Normally Phone will not allow you to install GDeskTaskManS60.0.33g.sis. It will give following error
Certificate is expired
You have to sign the application and install it
How can you sign an application? Generate a certificate using this site and sign it.
Or try a self signing application  using application called FreeSigner
5. Now run GDesk from your installed applications.
6. Tap your screen, then click on Design >>  Load Design
select Android 2.1.gdd from your phone
Location : Memory card\+GDesk\Android 2.1.gdd
7. Now go to options and tick following option for better result
Replace Main
Full Screen
Hide title caption
Disable menu tap
It is compactable with Nokia 5230, 5800, 5235 and 5233

How to get ride from facebook chat virus?


Hope you noticed that a facebook chat virus is spreading links with some attractive messages. See some sample messages here.
facebook chat malware
“Did you see how will u look like in 20 years from now? lol —-> {bitly link }”
“ Hey!! is this photo urs? … OMG!!! —-> {bitly link }”
“ omg hahah have u seen this photo u got tagged in LOL —-> {bitly link }”


facebook virus deny
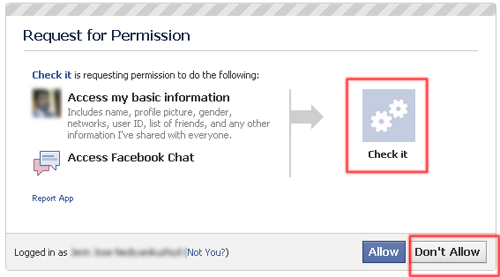
This messages are pop up with a bit.ly shortened url of  “http:// yaira .info” If you clicked any of the link it will ask for a facebook application access request. this is the last option to stay away from this kind of fake applications. If you click on “Don’t Allow” button, nothing will happen. Instead of that if you are clicking on “Allow” button it will grand the access to facebook chat.You can see the access type in the popup message. Here it is “Access Facebook Chat” Normally genuine applications will show the Icon and application name. Here the application name is “Check it”.

If you are permitted this Facebook application to access your Facebook chat, It will start spreading messages with infected links to your online friends.
There is an option to remove this Rogue application. By checking infected facebook accounts we come in a conclusion that this application is not retaining access. you can check it on your Privacy settings.
Go to “Accounts” > “Privacy Settings
Find “Apps and Websites” in bottom and click on “Edit Your Settings
Click on “Edit settings” Under “Apps you use”
Here you can see the applications retain access to your account

If you see an application named “Check it” Select “Remove app
Also find and clean all applications which is not familiar.